Basics of Kubernetes Volumes – Part 1

We continue our “Kubernetes in a Nutshell” journey and this part will cover Kubernetes Volumes! You will learn about:

  • Overview of Volumes and why they are needed
  • How to use a Volume
  • Hands-on example to help explore Volumes practically

The code is available on GitHub

Happy to get your feedback via Twitter or just drop a comment!

Pre-requisites:

You are going to need minikube and kubectl.

Install minikube as a single-node Kubernetes cluster in a virtual machine on your computer. On a Mac, you can simply:

curl -Lo minikube https://storage.googleapis.com/minikube/releases/latest/minikube-darwin-amd64 \
  && chmod +x minikube

sudo mv minikube /usr/local/bin

Install kubectl to interact with yur AKS cluster. On a Mac, you can simply:

curl -LO https://storage.googleapis.com/kubernetes-release/release/$(curl -s https://storage.googleapis.com/kubernetes-release/release/stable.txt)/bin/darwin/amd64/kubectl
chmod +x ./kubectl
sudo mv ./kubectl /usr/local/bin/kubectl

Overview

Data stored in Docker containers is ephemeral i.e. it only exists until the container is alive. Kubernetes can restart a failed or crashed container (in the same Pod), but you will still end up losing any data which you might have stored in the container filesystem. Kubernetes solves this problem with the help of Volumes. It supports many types of Volumes including external cloud storage (e.g. Azure Disk, Amazon EBS, GCE Persistent Disk etc.), networked file systems such as Ceph, GlusterFS etc. and others options like emptyDir, hostPath, local, downwardAPI, secret, config etc.

How are Volumes used?

Using a Volume is relatively straightforward – look at this partial Pod spec as an example

spec:
  containers:
  - name: kvstore
    image: abhirockzz/kvstore:latest
    volumeMounts:
    - mountPath: /data
      name: data-volume
    ports:
    - containerPort: 8080
  volumes:
    - name: data-volume
      emptyDir: {}

Notice the following:

  • spec.volumes – declares the available volume(s), its name (e.g. data-volume) and other (volume) specific characteristics e.g. in this case, its points to an Azure Disk
  • spec.containers.volumeMounts – it points to a volume declared in spec.volumes (e.g. data-volume) and specifies exactly where it wants to mount the that volume within the container file system (e.g. /data).

A Pod can have more than one Volume declared in spec.volumes. Each of these Volumes is accessible to all containers in the Pod but it’s not mandatory for all the containers to mount or make use of all the volumes. If needed, a container within the Pod can mount more than one volume into different paths in its file system. Also, different containers can possibly mount a single volume at the same time.

Another way of categorizing Volumes

I like to divide them as:

  • EmphemeralVolumes which are tightly coupled with the Pod lifetime (e.g. emptyDir volume) i.e. they are deleted if the Pod is removed (for any reason).
  • PersistentVolumes which are meant for long term storage and independent of the Pod or the Node lifecycle. This could be NFS or cloud based storage in case of managed Kubernetes offerings such as Azure Kubernetes Service, Google Kubernetes Engine etc.

Let’s look at emptyDir as an example

emptyDir volume in action

An emptyDir volume starts out empty (hence the name!) and is ephemeral in nature i.e. exists only as long as the Pod is alive. Once the Pod is deleted, so is the emptyDir data. It is quite useful in some scenarios/requirements such as a temporary cache, shared storage for multiple containers in a Pod etc.

To run this example, we will use a naive, over-simplified key-value store that exposes REST APIs for

  • adding key value pairs
  • reading the value for a key

Here is the code if you’re interested

Initial deployment

Start minikube if already not running

minikube start

Deploy the kvstore application. This will simply create a Deployment with one instance (Pod) of the application along with a NodePort service

kubectl apply -f https://raw.githubusercontent.com/abhirockzz/kubernetes-in-a-nutshell/master/volumes-1/kvstore.yaml

To keep things simple, the YAML file is being referenced directly from the GitHub repo, but you can also download the file to your local machine and use it in the same way.

Confirm they have been created

kubectl get deployments kvstore

NAME      READY   UP-TO-DATE   AVAILABLE   AGE
kvstore   1/1     1            1           28s

kubectl get pods -l app=kvstore

NAME                       READY   STATUS    RESTARTS   AGE
kvstore-6c94877886-gzq25   1/1     Running   0          40s

It’s ok if you do not know what a NodePort service is – it will be covered in a subsequent blog post. For the time being, just understand that it is a way to access our app (REST endpoint in this case)

Check the value of the random port generated by the NodePort service – You might see a result similar to this (with different IPs, ports)

kubectl get service kvstore-service

NAME              TYPE       CLUSTER-IP      EXTERNAL-IP   PORT(S)          AGE
kvstore-service   NodePort   10.106.144.48   <none>        8080:32598/TCP   5m

Check the PORT(S) column to find out the random port e.g. it is 32598 in this case (8080 is the internal port within the container exposed by our app – ignore it)

Now, you just need the IP of your minikube node using minikube ip

This might return something like 192.168.99.100 if you’re using a VirtualBox VM

In the commands that follow replace host with the minikube VM IP and port with the random port value

Create a couple of new key-value pair entries

curl http://[host]:[port]/save -d 'foo=bar'
curl http://[host]:[port]/save -d 'mac=cheese'

e.g.

curl http://192.168.99.100:32598/save -d 'foo=bar'
curl http://192.168.99.100:32598/save -d 'mac=cheese'

Access the value for key foo

curl http://[host]:[port]/read/foo

You should get the value you had saved for foobar. Same applies for mac i.e. you’ll get cheese as its value. The program saves the key-value data in /data – let’s confirm that by peeking directly into the Docker container inside the Pod

kubectl exec <pod name> -- ls /data/

foo
mac

foo, mac are individual files named after the keys. If we dig in further, we should be able to confirm thier respective values as well

To confirm value for the key mac

kubectl exec <pod name> -- cat /data/mac`

cheese

As expected, you got cheese as the answer since that’s what you had stored earlier. If you try to look for a key which you haven’t store yet, you’ll get an error

cat: can't open '/data/moo': No such file or directory
command terminated with exit code 1

Kill the container 😉

Alright, so far so good! Using a Volume ensures that the data will be preserved across container restarts/crash. Let’s ‘cheat’ a bit and manually kill the Docker container.

kubectl exec [pod name] -- ps

PID   USER     TIME  COMMAND
  1   root     0:00 /kvstore
  31 root      0:00  ps

Notice the process ID for the kvstore application (should be 1)

In a different terminal, set a watch on the Pods

kubectl get pods -l app=kvstore --watch

We kill our app process

kubectl exec [pod name] -- kill 1

You will notice that the Pod will transition through a few phases (like Error etc.) before going back to Running state (re-started by Kubernetes).

NAME                       READY     STATUS    RESTARTS   AGE
kvstore-6c94877886-gzq25   1/1       Running   0         15m
kvstore-6c94877886-gzq25   0/1       Error     0         15m
kvstore-6c94877886-gzq25   1/1       Running   1         15m

Execute kubectl exec <pod name> -- ls /data to confirm that the data in fact survived inspite of the container restart.

Delete the Pod!

But the data will not survive beyond the Pod’s lifetime. To confirm this, let’s delete the Pod manually

kubectl delete pod -l app=kvstore

You should see a confirmation such as below

pod "kvstore-6c94877886-gzq25" deleted

Kubernetes will restart the Pod again. You can confirm the same after a few seconds

kubectl get pods -l app=kvstore

you should see a new Pod in Running state

Get the pod name and peek into the file again

kubectl get pods -l app=kvstore
kubectl exec [pod name] -- ls /data/store

As expected, the /data/ directory will be empty!

The need for persistent storage

Simple (ephemeral) Volumes live and die with the Pod – but this is not going to suffice for a majority of applications. In order to be resilient, reliable, available and scalable, Kubernetes applications need to be able to run as multiple instances across Pods and these Pods themselves might be scheduled or placed across different Nodes in your Kubernetes cluster. What we need is a stable, persistent store which outlasts the Pod or even the Node on which the Pod is running.

As mentioned in the beginning of this blog, it’s simple to use a Volume – not just temporary ones like the one we just saw, but even long term persistent stores.

Here is a (contrived) example of how to use Azure Disk as a storage medium for your apps deployed to Azure Kubernetes Service.

apiVersion: v1
kind: Pod
metadata:
  name: testpod
spec:
  volumes:
  - name: logs-volume
    azureDisk:
          kind: Managed
          diskName: myAKSDiskName
          diskURI: myAKSDiskURI
  containers:
  - image: myapp-docker-image
    name: myapp
    volumeMounts:
    - mountPath: /app/logs
      name: logs-volume

So that’s it? Not quite! 😉 There are limitations to this approach. This and much more will be discussed in the next part of the series – so stay tuned!

I really hope you enjoyed and learned something from this article 😃😃 Please like and follow if you did!

Posted in kubernetes | Tagged , , | Leave a comment

Using Azure Disk to add persistent storage for your Kubernetes apps on Azure

In this blog post, we will look at an example of how to use Azure Disk as a storage medium for your apps deployed to Azure Kubernetes Service.

You will:

  • Setup a Kubernetes cluster on Azure
  • Create an Azure Disk and a corresponding PersistentVolume
  • Create a PersistentVolumeClaim for the app Deployment
  • Test things out to see how it all works end to end

Overview

You can use Kubernetes Volumes to provide storage for your applications. There is support for multiple types of volumes in Kubernetes. One way of categorizing them is as follows

  • EphemeralVolumes which are tightly coupled with the Pod lifetime (e.g. emptyDir volume) i.e. they are deleted if the Pod is removed (for any reason).
  • PersistentVolumes which are meant for long term storage and independent of the Pod or the Node lifecycle. This could be NFS or cloud based storage in case of managed Kubernetes offerings such as Azure Kubernetes Service, Google Kubernetes Engine etc.

Kubernetes Volumes can be provisioned in a static or dynamic manner. In “static” mode, the storage medium e.g. Azure Disk, is created manually and then referenced using the Pod spec as below:

    volumes:
        - name: azure
            azureDisk:
            kind: Managed
            diskName: myAKSDisk
            diskURI: /subscriptions/<subscriptionID>/resourceGroups/MC_myAKSCluster_myAKSCluster_eastus/providers/Microsoft.Compute/disks/myAKSDisk

I would highly recommend reading through the excellent tutorial on how to “Manually create and use a volume with Azure disks in Azure Kubernetes Service (AKS)”

Is there a better way?

In the above Pod manifest, the storage info is directly specified in the Pod (using the volumes section). This implies that the developer needs to know all details of the storage medium e.g. in case of Azure Disk – the diskName, diskURI (disk resource URI), it’s kind (type). There is definitely scope for improvement here and like most things in software, it can be done with another level of indirection or abstraction using concepts of Persistent Volume and Persistent Volume Claim.

The key idea revolves around “segregation of duties” and decoupling storage creation/management from its usage:

  • When an app needs persistent storage for their application, the developer can request for it by “declaring” it in the pod spec – this is done using a PersistentVolumeClaim
  • The actual storage provisioning e.g. creation of Azure Disk (using azure CLI, portal etc.) and representing it in the Kubernetes cluster (using a PersistentVolume) can be done by another entity such as an admin

Let’s see this in action!

Pre-requisites:

You will need the following:

on your Mac, you can install kubectl as such:

curl -LO https://storage.googleapis.com/kubernetes-release/release/$(curl -s https://storage.googleapis.com/kubernetes-release/release/stable.txt)/bin/darwin/amd64/kubectl
chmod +x ./kubectl
sudo mv ./kubectl /usr/local/bin/kubectl

The code is available on GitHub. Please clone the repository before you proceed

git clone https://github.com/abhirockzz/aks-azuredisk-static-pv
cd aks-azuredisk-static-pv

Kubernetes cluster setup

You need a single command to stand up a Kubernetes cluster on Azure. But, before that, we’ll have to create a resource group

export AZURE_SUBSCRIPTION_ID=[to be filled]
export AZURE_RESOURCE_GROUP=[to be filled]
export AZURE_REGION=[to be filled] (e.g. southeastasia)

Switch to your subscription and invoke az group create

az account set -s $AZURE_SUBSCRIPTION_ID
az group create -l $AZURE_REGION -n $AZURE_RESOURCE_GROUP

You can now invoke az aks create to create the new cluster

To keep things simple, the below command creates a single node cluster. Feel free to change the specification as per your requirements

export AKS_CLUSTER_NAME=[to be filled]

az aks create --resource-group $AZURE_RESOURCE_GROUP --name $AKS_CLUSTER_NAME --node-count 1 --node-vm-size Standard_B2s --node-osdisk-size 30 --generate-ssh-keys

Get the AKS cluster credentials using az aks get-credentials – as a result, kubectl will now point to your new cluster. You can confirm the same

az aks get-credentials --resource-group $AZURE_RESOURCE_GROUP --name $AKS_CLUSTER_NAME
kubectl get nodes

If you are interested in learning Kubernetes and Containers using Azure, a good starting point is to use the quickstarts, tutorials and code samples in the documentation to familiarize yourself with the service. I also highly recommend checking out the 50 days Kubernetes Learning Path. Advanced users might want to refer to Kubernetes best practices or the watch some of the videos for demos, top features and technical sessions.

Create an Azure Disk for persistent storage

An Azure Kubernetes cluster can use Azure Disks or Azure Files as data volumes. In this example, we will explore Azure Disk. You have the option of an Azure Disk backed by a Standard HDD or a Premium SSD

Get the AKS node resource group

AKS_NODE_RESOURCE_GROUP=$(az aks show --resource-group $AZURE_RESOURCE_GROUP --name $AKS_CLUSTER_NAME --query nodeResourceGroup -o tsv)

Create an Azure Disk in the node resource group

export AZURE_DISK_NAME=<enter-azure-disk-name>

az disk create --resource-group $AKS_NODE_RESOURCE_GROUP --name $AZURE_DISK_NAME --size-gb 2 --query id --output tsv

we are creating a Disk with a capacity of 2 GB

You will get the resource ID of the Azure Disk as a response which will be used in the next step

/subscriptions/3a06a10f-ae29-4242-b6a7-dda0ea91d342/resourceGroups/MC_testaks_foo-aks_southeastasia/providers/Microsoft.Compute/disks/my-test-disk

Deploy the app to Kubernetes

The azure-disk-persistent-volume.yaml file contains the PersistentVolume details. We create it in order to map the Azure Disk within the AKS cluster.

apiVersion: v1
kind: PersistentVolume
metadata:
name: azure-disk-pv
spec:
capacity:
storage: 2Gi
storageClassName: ""
volumeMode: Filesystem
accessModes:
– ReadWriteOnce
azureDisk:
kind: Managed
diskName: <enter-disk-name>
diskURI: <enter-disk-resource-id>

Notice that the capacity (spec.capacity.storage) is 2 GB which is same as that of the Azure Disk we just created

Update azure-disk-persistent-volume.yaml with Azure Disk info

  • diskName – name of the Azure Disk which you chose earlier
  • diskURI – resource ID of the Azure Disk

Create the PersistentVolume

kubectl apply -f azure-disk-persistent-volume.yaml

persistentvolume/azure-disk-pv created

Next we need to create the PersistentVolumeClaim which we will use as a reference in the Pod specification

apiVersion: v1
kind: PersistentVolumeClaim
metadata:
name: azure-disk-pvc
spec:
storageClassName: ""
accessModes:
ReadWriteOnce
resources:
requests:
storage: 2Gi

we are requesting for 2 GB worth of storage (using resources.request.storage)

To create it:

kubectl apply -f azure-disk-persistent-volume-claim.yaml

persistentvolumeclaim/azure-disk-pvc created

Check the PersistentVolume

kubectl get pv/azure-disk-pv


NAME            CAPACITY   ACCESS MODES   RECLAIM POLICY   STATUS   CLAIM    STORAGECLASS   REASON   AGE
azure-disk-pv   2Gi        RWO            Retain           Bound    default/azure-disk-pvc            8m35s

Check the PersistentVolumeClaim

kubectl get pvc/azure-disk-pvc

NAME             STATUS   VOLUME          CAPACITY   ACCESS MODES   STORAGECLASS   AGE
azure-disk-pvc   Bound    azure-disk-pv   2Gi        RWO                           9m55s

Notice (in the STATUS section of the above outputs) that the PersistentVolume and PersistentVolumeClaim are Bound to each other

Test

To test things out, we will use a simple Go app. All it does is push log statements to a file logz.out in /mnt/logs – this is the path which is mounted into the Pod

func main() {
    ticker := time.NewTicker(3 * time.Second)
    exit := make(chan os.Signal, 1)
    signal.Notify(exit, syscall.SIGTERM, syscall.SIGINT)
    for {
        select {
        case t := <-ticker.C:
            logToFile(t.String())
        case <-exit:
            err := os.Remove(fileLoc + fileName)
            if err != nil {
                log.Println("unable to delete log file")
            }
            os.Exit(1)
        }
    }
}

To create our app as a Deployment

kubectl apply -f app-deployment.yaml

Wait for a while for the deployment to be in Running state

kubectl get pods -l=app=logz

NAME                               READY   STATUS    RESTARTS   AGE
logz-deployment-59b75bc786-wt98d   1/1     Running   0          15s

To confirm, check the /mnt/logs/logz.out in the Pod

kubectl exec -it $(kubectl get pods -l=app=logz --output=jsonpath={.items..metadata.name}) -- tail -f /mnt/logs/logz.out

You will see the logs (just the timestamp) every 3 seconds. This is because the Azure Disk storage has been mounted inside your Pod

2019-09-23 10:00:18.308746334 +0000 UTC m=+3.002071866
2019-09-23 10:00:21.308779348 +0000 UTC m=+6.002104880
2019-09-23 10:00:24.308771261 +0000 UTC m=+9.002096693
2019-09-23 10:00:27.308778874 +0000 UTC m=+12.002104406
2019-09-23 10:00:30.308804587 +0000 UTC m=+15.002130219

Once you’re done testing, you can delete the resources to save costs.

To clean up

az group delete --name $AZURE_RESOURCE_GROUP --yes --no-wait

This will delete all resources under the resource group

That’s all for this blog! You saw how to attach and mount an Azure Disk instance to your app running in AKS using standard Kubernetes primitives like PersistentVolume and PersistentVolume. Stay tuned for more 😃😃

I really hope you enjoyed and learned something from this article! Please like and follow if you did. Happy to get feedback via Twitter or just drop a comment 👇👇

Posted in kubernetes | Tagged , , | Leave a comment

“Kubernetes in a Nutshell” — blog series

This series is going to cover the “breadth” of Kubernetes and the core/fundamental topics. It will be done in a practical way where you get your “hands dirty” by trying things out — we will use minikube (locally) or the managed Azure Kubernetes Service cluster(s) where applicable.

List of blogs…

I’ll keep updating the links here as I post new ones:

Beyond Pods: how to orchestrate stateless apps in Kubernetes?

This ☝️ is the first part that covers native Kubernetes primitives for managing stateless applications.

How to configure your Kubernetes apps using the ConfigMap object?

This ☝️ blog post provides a hands-on guide to app configuration related options available in Kubernetes.

Why..?

Kubernetes can be quite intimidating to start with. This might be helpful for folks who have looked into Kubernetes but haven’t really dived in yet. So, you will notice that I’ll get into the weeds straight away and not cover topics like “What is Kubernetes?” etc.
I cannot cover “everything” though (even if I wanted to!). But, hopefully, this will help you get over that initial hurdle and know “just enough” to explore Kubernetes further, seek specific areas that interest you and proceed independently.

I cannot cover “everything” though (even if I wanted to!). But, hopefully, this will help you get over that initial hurdle and know “just enough” to explore Kubernetes further, seek specific areas that interest you and proceed independently.

Please like, follow if you found this useful! 🙂 Happy to get feedback via @abhi_tweeter or just drop a comment.

Posted in kubernetes | Tagged , , | 1 Comment

Deep dive into Kubernetes components required to run stateful Kafka Streams applications

Happy to get feedback via @abhi_tweeter or just drop a comment!

One of the previous blogs was about building a stateless stream processing application using the Kafka Streams library and deploying it to Kubernetes as in the form of a Deployment object.

In this part, we will continue exploring the powerful combination of Kafka Streams and Kubernetes. But this one is all about stateful applications and how to leverage specific Kubernetes primitives using a Kubernetes cluster on Azure (AKS) to run it.

I will admit right away that this is a slightly lengthy blog, but there are a lot of things to cover and learn!

As you go through this, you’ll learn about the following:

  • Kafka Streams
    • What is Kafka Streams?
    • Concepts of stateful Kafka Streams applications
  • Behind-the-scenes
    • What’s going on in the Java code for stream processing logic using Kafka Streams
    • Kubernetes components for running Stateful Kafka Streams apps such StatefulSet, Volume Claim templates and other configuration parameters like Pod anti-affinity
    • How is this all setup using Azure Kubernetes Service for container orchestration and Azure Disk for persistence storage
  • How to set up and configure a Docker container registry and Azure Kubernetes cluster
  • How to build & deploy our app to Kubernetes and finally test it out using the Kafka CLI

The source code is on GitHub

Let’s get started!

Pre-requisites:

If you don’t have it already, please install the Azure CLI and kubectl. The stream processing app is written in Java and uses Maven. You will also need Docker to build the app container image.

This tutorial assumes you have a Kafka cluster which is reachable from your Kubernetes cluster on Azure

Kafka Streams

This section will provide a quick overview of Kafka Streams and what “state” means in the context of Kafka Streams based applications.

Overview of Kafka Streams

It is a simple and lightweight client library, which can be easily embedded in any Java app or microservice, where the input and output data are stored in Kafka clusters. It has no external dependencies on systems other than Kafka itself and it’s partitioning model to horizontally scale processing while maintaining strong ordering guarantees. It has support for fault-tolerant local state, employs one-record-at-a-time processing to achieve millisecond processing latency and offers necessary stream processing primitives, along with a high-level Streams DSL and a low-level Processor API. The combination of “state stores” and Interactive queries allow you to leverage the state of your application from outside your application.

Stateful Kafka Streams app

Most stream processing apps need contextual data i.e. state in order e.g. to maintain a running count of items in an inventory, you’re going to need the last “count” in order to calculate the “current” count.

You can deploy multiple Kafka Streams app instances to scale your processing. Since each instance churns data from one or more partitions (of a Kafka topic), the state associated with each instance is stored locally (unless you’re the GlobalKTable API – deserves a dedicated blog post!). Kafka Streams supports “stateful” processing with the help of state stores. Typically, it is file-system based (Kafka Streams uses an embedded RocksDB database internally) but you also have the option of using an in-memory hash-map, or use the pluggable nature of the Kafka Streams Processor API to build a custom implementation a state store.

In addition to storing the state, Kafka Streams has built-in mechanisms for fault-tolerance of these state stores. The contents of each state store are backed-up to a replicated, log-compacted Kafka topic. If any of your Kafka Streams app instance fails, another one can come up, restore the current state from Kafka and continue processing. In addition to storing state, you can also “query” these state stores. That’s a topic for another blog post altogether – stay tuned!

Please note that it is possible to tune the “fault tolerance” behavior i.e. you can choose not to back-up your local state store to Kafka

Before you dive in, here is a high level overview of the solution
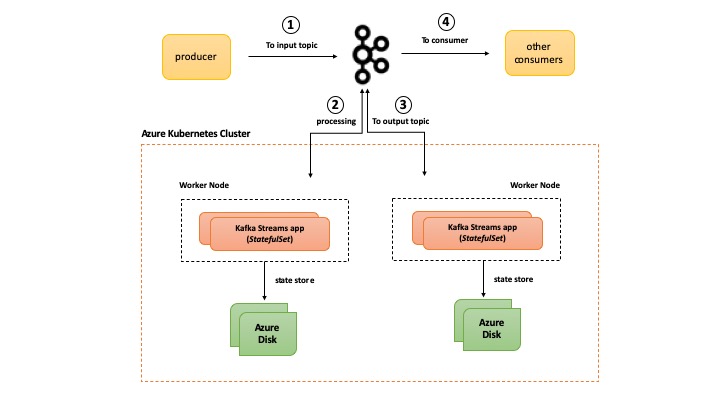
Behind the scenes

Let’s look at what the stream processing code is upto and then dive into some of the nitty-gritty of the Kubernetes primitives and what value they offer when running “stateful” Kafka Streams apps.

Stream processing code

The processing pipeline executes something similar to the canonical “word count”. It makes use of the high-level Streams DSL API:

  • receives a stream of key-value pairs from an input/source Kafka topic e.g. foo:bar, john:doe, foo:bazz etc.
  • keeps and stores a count of the keys (ignores the values) e.g. foo=2, john=1 etc.
  • forwards the count to an output Kafka topic (sink)

Please note that the latest Kafka Streams library version at the time of writing was 2.3.0 and that’s what the app uses

        org.apache.kafka
        kafka-streams
        2.3.0

We start off with an instance of StreamsBuilder and invoke it’s stream method to hook on to the source topic. What we get is a KStream object which is a representation of the continuous stream of records sent to the topic.

    StreamsBuilder builder = new StreamsBuilder();
    KStream inputStream = builder.stream(INPUT_TOPIC);

We use groupByKey on the input KStream to group the records by their current key into a KGroupedStream. In order to keep a count of the keys, we use the count method (not a surprise!). We also ensure that the word count i.e. foo=5, bar=3 etc. is persisted to a state store – Materialized is used to describe how that state store should be persisted. In this case, a specific name is chosen and the exact location on disk is mentioned in the KafkaStreams configuration as such: configurations.put(StreamsConfig.STATE_DIR_CONFIG, "/data/count-store");

the default behavior is to store the state on disk using RocksDB unless configured differently

    inputStream.groupByKey()
               .count(Materialized.&lt;String, Long, KeyValueStore&gt;as("count-store")
                    .withKeySerde(Serdes.String())
                    .withValueSerde(Serdes.Long()))

Finally, for ease of demonstration, we convert the KTable (created by count) back to a KStream using toStream, convert the java.lang.Long (that’s the count data type) into a String using mapValues and pass on the result to an output topic. This just for easy consumption in the Kafka CLI so that you’re able to actually see the final count of each of the words.

            .toStream()
            .mapValues(new ValueMapper() {
                @Override
                public String apply(Long v) {
                    return String.valueOf(v);
                }
            })
            .to(OUTPUT_TOPIC);

That’s all in terms of setting up the stream and defining the logic. We create a Topology object using the build method in StreamsBuilder and use this object to create a KafkaStreams instance which is a representation of our application itself. We start the stream processing using the start method

    Topology topology = builder.build();
    KafkaStreams streamsApp = new KafkaStreams(topology, getKafkaStreamsConfig());
    streamsApp.start();

The getKafkaStreamsConfig() is just a helper method which creates a Properties object which contains Kafka Streams specific configuration, including Kafka broker endpoint etc.

static Properties getKafkaStreamsConfig() {
    String kafkaBroker = System.getenv().get(KAFKA_BROKER_ENV_VAR);
    Properties configurations = new Properties();
    configurations.put(StreamsConfig.BOOTSTRAP_SERVERS_CONFIG, kafkaBroker + ":9092");
    configurations.put(StreamsConfig.APPLICATION_ID_CONFIG, APP_ID);
    configurations.put(StreamsConfig.DEFAULT_KEY_SERDE_CLASS_CONFIG, Serdes.String().getClass().getName());
    configurations.put(StreamsConfig.DEFAULT_VALUE_SERDE_CLASS_CONFIG, Serdes.String().getClass().getName());
    configurations.put(StreamsConfig.REQUEST_TIMEOUT_MS_CONFIG, "20000");
    configurations.put(StreamsConfig.RETRY_BACKOFF_MS_CONFIG, "500");
    configurations.put(StreamsConfig.STATE_DIR_CONFIG, STATE_STORE_DIR);

    return configurations;
}

Kubernetes primitives

So far so good! We have the Kafka Streams app churning out word counts and storing them. We can simply run this as a Kubernetes Deployment (as demonstrated in the previous blog), but there are some benefits to be gained by using something called a StatefulSet.

StatefulSet is a topic that deserves a blog (or more!) by itself. The goal is not to teach you everything about Kubernetes StatefulSets in this blog, but provide enough background and demonstrate how its features can be leveraged for stateful Kafka Streams apps.

StatefulSet: the What

Here is a gist what StatefulSets offer for running stateful workloads in Kubernetes

  • Pod uniqueness – Each Pod in a StatefulSet is unique and this maintained across restarts, re-scheduling etc. This also applies to networking and communication (inter-Pod or external)
  • Persistent storage – using a Volume Claim template, you can request for storage allocation for each Pod in a StatefulSet such that there is one to one mapping b/w the Pod and the storage medium
  • Managed lifecycle – You can be explicit about how to manage the lifecycle of the Pods across various stages including starts, updates, deletion. StatefulSet Pods can be configured to handle this is an ordered manner.

All these are in stark contrast to general Deployments which handle Pods as disposable entities with no identity, the concept of “stable” attached storage or ordered lifecycle management.

StatefulSet: the Why

Let’s explore the motivation behind why we want to use StatefulSets for this specific scenario i.e. a stateful Kafka Streams app.

As previously mentioned, you can run multiple Kafka Streams app instances. Each instance processes data from one or more partitions (of a topic) and stores the associated state locally. Fault tolerance and resiliency is also built into Kafka Streams app because the contents of each state store is backed-up to a replicated, log-compacted Kafka topic. If any of your Kafka Streams app instance fails, another one can come up, restore the current state from Kafka and continue processing.

Now here is the catch. Any serious application with a reasonably complex topology and processing pipeline will generate a lot of “state”. In such as case, regular app operations like scale-out or anomalies such as crashes etc. will trigger the process of restore/refresh state from the Kafka back-up topic. This can be costly in terms of time, network bandwidth etc. Using StatefulSet, we can ensure that each Pod will always have a stable storage medium attached to it and this will be stable (not change) over the lifetime of the StatefulSet. This means that after restarts, upgrades etc. (most of) the state is already present locally on the disk and the app only needs to fetch the “delta” state from the Kafka topics (if needed). This implies that state recovery time will be much smaller or may not even be required in few cases.

In this example, we will be making use of the first two features of StatefulSet i.e. Pod uniqueness and stable Persistent Storage.

StatefulSet: the How

It’s time to see how it’s done. Let’s start by exploring the Kubernetes YAML manifest (in small chunks) for our application – we will later use this to deploy the app to AKS

We define the name of our StatefulSet (kstreams-count) and refer to a Headless Service(kstreams-count-service) which is responsible for the unique network identity – it is bundled along with StatefulSet itself.

apiVersion: apps/v1
kind: StatefulSet
metadata:
    name: kstreams-count
spec:
    serviceName: "kstreams-count-service"

The Headless Service should be created before the StatefulSet

apiVersion: v1
kind: Service
metadata:
name: kstreams-count-service
labels:
    app: kstreams-count
spec:
clusterIP: None
selector:
    app: kstreams-count

The Pod specification (spec.containers) points to the Docker image and defines the environment variable KAFKA_BROKER which which will be injected within our app at runtime.

spec:
  containers:
  - name: kstreams-count
    image: .azurecr.io/kstreams-count:latest
    env:
      - name: KAFKA_BROKER
        value: [to be filled]

In addition to the above, the container spec also defines the persistent storage. In this case, it means that the container will use a stable storage to store the contents in the specified path which in this case is /data/count-store (recall that this is the local state directory as configured in our Kafka Streams app)

volumeMounts:
    - name: count-store
      mountPath: /data/count-store

How is this persistent storage going to come to life and made available to the Pod? The answer lies in a Volume Claim Template specified as a part of the StatefulSet spec. One PersistentVolumeClaim and PersistentVolume will be created for each Volume Claim Template.

volumeClaimTemplates:
- metadata:
    name: count-store
    spec:
    accessModes: [ "ReadWriteOnce" ]
    resources:
        requests:
        storage: 1Gi

So how does the storage medium get created?

This is powered by Dynamic Provisioning which enables storage volumes to be created on-demand. Otherwise, cluster administrators have to manually provision cloud based storage and then create equivalent PersistentVolume objects in Kubernetes. Dynamic provisioning eliminates this by automatically provisioning storage when it is requested by users.

Dynamic provisioning itself uses a StorageClass which provides a way to describe the type of storage using a set of parameters along with a volume plugin which actually takes care of the storage medium provisioning. Azure Kubernetes Service makes dynamic provisioning easy by including two pre-seeded storage classes:

You can check the same by running kubectl get storageclass command

NAME                PROVISIONER                AGE
default (default)   kubernetes.io/azure-disk   6d10h
managed-premium     kubernetes.io/azure-disk   6d10h

Note that kubernetes.io/azure-disk is the volume plugin (provisioner implementation)

Since, we don’t have an explicit StorageClass defined in the volume claim template, so the default StorageClass will be used. For each instance of your Kafka Streams app, an Azure Disk instance will be created and mounted into the Pod representing the app.

Finally, we use Pod anti-affinity (nothing to do with StatefulSet) – this is to ensure that no two instances of our app are located on the same node.

  affinity:
    podAntiAffinity:
      requiredDuringSchedulingIgnoredDuringExecution:
      - labelSelector:
          matchExpressions:
          - key: app
            operator: In
            values:
            - kstreams-count
        topologyKey: "kubernetes.io/hostname"

Let’s move on to the infrastructure setup.

AKS cluster setup

You need a single command to stand up a Kubernetes cluster on Azure. But, before that, we’ll have to create a resource group

export AZURE_SUBSCRIPTION_ID=[to be filled]
export AZURE_RESOURCE_GROUP=[to be filled]
export AZURE_REGION=[to be filled] (e.g. southeastasia)

Switch to your subscription and invoke az group create

az account set -s $AZURE_SUBSCRIPTION_ID
az group create -l $AZURE_REGION -n $AZURE_RESOURCE_GROUP

You can now invoke az aks create to create the new cluster

To keep things simple, the below command creates a two node cluster. Feel free to change the specification as per your requirements

export AKS_CLUSTER_NAME=[to be filled]

az aks create --resource-group $AZURE_RESOURCE_GROUP --name $AKS_CLUSTER_NAME --node-count 2 --node-vm-size Standard_B2s --node-osdisk-size 30 --generate-ssh-keys

Get the AKS cluster credentials using az aks get-credentials – as a result, kubectl will now point to your new cluster. You can confirm the same

az aks get-credentials --resource-group $AZURE_RESOURCE_GROUP --name $AKS_CLUSTER_NAME
kubectl get nodes

If you are interested in learning Kubernetes and Containers using Azure, simply create a free account and get going! A good starting point is to use the quickstarts, tutorials and code samples in the documentation to familiarize yourself with the service. I also highly recommend checking out the 50 days Kubernetes Learning Path. Advanced users might want to refer to Kubernetes best practices or the watch some of the videos for demos, top features, and technical sessions.

Setup Azure Container Registry

Simply put, Azure Container Registry (ACR in short) is a managed private Docker registry in the cloud which allows you to build, store, and manage images for all types of container deployments.

Start by creating an ACR instance

export ACR_NAME=[to be filled]
az acr create --resource-group $AZURE_RESOURCE_GROUP --name $ACR_NAME --sku Basic

valid SKU values – Basic, Classic, Premium, Standard. See command documentation

Configure ACR to work with AKS

To access images stored in ACR, you must grant the AKS service principal the correct rights to pull images from ACR.

Get the appId of the service principal which is associated with your AKS cluster

AKS_SERVICE_PRINCIPAL_APPID=$(az aks show --name $AKS_CLUSTER_NAME --resource-group $AZURE_RESOURCE_GROUP --query servicePrincipalProfile.clientId -o tsv)

Find the ACR resource ID

ACR_RESOURCE_ID=$(az acr show --resource-group $AZURE_RESOURCE_GROUP --name $ACR_NAME --query "id" --output tsv)

Grant acrpull permissions to AKS service principal

az role assignment create --assignee $AKS_SERVICE_PRINCIPAL_APPID --scope $ACR_RESOURCE_ID --role acrpull

For some more details on this topic, check out one of my previous blog

How to get your Kubernetes cluster service principal and use it to access other Azure services?

Alright, our AKS cluster along with ACR is ready to use!

From your laptop to a Docker Registry in the cloud

Clone the GitHub repo, change to the correct directory and build the application JAR

git clone https://github.com/abhirockzz/kafka-streams-stateful-kubernetes
cd kafka-streams-stateful-kubernetes
mvn clean install

You should see kstreams-count-statefulset-1.0.jar in the target directory

Here is the Dockerfile for our stream processing app

FROM openjdk:8-jre
WORKDIR /
COPY target/kstreams-count-statefulset-1.0.jar /
CMD ["java", "-jar","kstreams-count-statefulset-1.0.jar"]

We will now build a Docker image …

export DOCKER_IMAGE=kstreams-count
export ACR_SERVER=$ACR_NAME.azurecr.io
docker build -t $DOCKER_IMAGE .

… and push it to Azure Container Registry

az acr login --name $ACR_NAME
docker tag $DOCKER_IMAGE $ACR_SERVER/$DOCKER_IMAGE
docker push $ACR_SERVER/$DOCKER_IMAGE

Once this is done, you can confirm using az acr repository list

az acr repository list --name $ACR_NAME --output table

Deploy to Kubernetes

To deploy and confirm

kubectl apply -f kstreams-count-statefulset.yaml
kubectl get pods -l=app=kstreams-count

The app will take some time to start up since this also involves storage (Azure Disk) creation and attachment. After some time, you should see two pods in the Running state

The moment of truth!

It’s time to test our end to end flow. Just to summarize:

  • you will produce data to the input Kafka topic (input-topic) using the Kafka CLI locally
  • the stream processing application in AKS will churn the data, store state and put it back to another Kafka topic
  • your local Kafka CLI based consumer process will get that data from the output topic (counts-topic)

Let’ create the Kafka topics first

export KAFKA_HOME=[kafka installation directory]
export INPUT_TOPIC=input-topic
export OUTPUT_TOPIC=counts-topic

$KAFKA_HOME/bin/kafka-topics.sh --create --topic $INPUT_TOPIC --partitions 4 --replication-factor 1 --bootstrap-server $KAFKA_BROKER
$KAFKA_HOME/bin/kafka-topics.sh --create --topic $OUTPUT_TOPIC --partitions 4 --replication-factor 1 --bootstrap-server $KAFKA_BROKER

$KAFKA_HOME/bin/kafka-topics.sh --list --bootstrap-server $KAFKA_BROKER

Start consumer process

export KAFKA_HOME=[kafka installation directory]
export KAFKA_BROKER=[kafka broker e.g. localhost:9092]
export OUTPUT_TOPIC=counts-topic

$KAFKA_HOME/bin/kafka-console-consumer.sh --bootstrap-server 
$KAFKA_BROKER --topic $OUTPUT_TOPIC --from-beginning --property "print.key=true"

Start producer process (different terminal)

export KAFKA_HOME=[kafka installation directory]
export KAFKA_BROKER=[kafka broker e.g. localhost:9092]
export INPUT_TOPIC=input-topic

$KAFKA_HOME/bin/kafka-console-producer.sh --broker-list $KAFKA_BROKER --topic $INPUT_TOPIC

You will get a prompt and you can start entering values e.g.

&gt; foo:bar
&gt; hello:world
&gt; hello:universe
&gt; foo:baz
&gt; john:doe

In the consumer terminal, you should see the words and their respective counts e.g. foo 2, hello 2, john 1 etc.

With the sanity testing out of the way…

… let’s look at the state of AKS cluster.

Check the PersistentVolumeClaims (PVC) and PersistentVolumes (PV) – you will two separate set of PVC-PV pairs.

kubectl get pv
kubectl get pvc

The creation of PersistentVolumes means that Azure Disks were created as well. To check them, let’s get AKS node resource group first

AKS_NODE_RESOURCE_GROUP=$(az aks show --resource-group abhishgu-aks --name abhishgu-aks --query nodeResourceGroup -o tsv)

Assuming there this is a two node AKS cluster we will get back four disks – one each for the two nodes and one each of for two of our app instances

az disk list -g $AKS_NODE_RESOURCE_GROUP

You will notice that name of disk is the same as that of the PVC

Let’s dig into the file system of the Pod which is running our application. kstreams-count-0 is the name of one such instance (yes, the name is deterministic, thanks to StatefulSet). Recall that we specified /data/count-store as the state store directory in our app as well the as volumeMounts section of the app manifest – let’s peek into that directory.

kubectl exec -it kstreams-count-0 -- ls -lrt /data/count-store/counts-app

You will notice that the state data split across multiple sub-directories whose number will be equal to the number of topic partitions which the app instance is handling e.g. if you have four partitions and two instances, each of them will handle data from two partitions each

total 24
drwxr-xr-x 3 root root 4096 Sep 16 11:58 0_0
drwxr-xr-x 3 root root 4096 Sep 16 12:02 0_1

you can repeat the same process for the second instance i.e. kstreams-count-1

If you list the number of topics using the Kafka CLI, you should also see a topic named counts-app-counts-store-changelog. This is the back-up, log-compacted changelog topic which we discussed earlier

the name format is --changelog

Clean up

Start by deleting the StatefulSet and associated Headless Service

kubectl delete -f kstreams-count-statefulset.yaml

The PersistentVolumes associated with the PersistentVolumeClaims are not deleted automatically

kubectl delete pvc

This will trigger the deletion of the PersistentVolumes and the corresponding Azure Disks. You can confirm the same

kubectl get pv
az disk list -g $AKS_NODE_RESOURCE_GROUP

Finally, to clean up your AKS cluster, ACR instance and related resources

az group delete --name $AZURE_RESOURCE_GROUP --yes --no-wait

That’s all for this blog! If you found it helpful, please like and follow 🙂

Posted in kubernetes | Tagged , , | Leave a comment

How to configure your Kubernetes apps using the ConfigMap object?

“Separation of configuration from code” is one of the tenets of the 12-factor applications. We externalize things which can change and this in turn helps keep our applications portable. This is critical in the Kubernetes world where our applications are packaged as Docker images. A Kubernetes ConfigMap allows us to abstract configuration from code and ultimately the Docker image.

This blog post will provide a hands-on guide to app configuration related options available in Kubernetes.

As always, the code is available on GitHub. So let’s get started….

To configure your apps in Kubernetes, you can use:

  • Good old environment variables
  • ConfigMap
  • Secret — this will be covered in a subsequent blog post

You will need a Kubernetes cluster to begin with. This could be a simple, single-node local cluster using minikube, Docker for Mac etc. or a managed Kubernetes service from Azure (AKS), Google, AWS etc. To access your Kubernetes cluster, you will need kubectl, which is pretty easy to install.

e.g. to install kubectl for Mac, all you need is

curl -LO https://storage.googleapis.com/kubernetes-release/release/$(curl -s https://storage.googleapis.com/kubernetes-release/release/stable.txt)/bin/darwin/amd64/kubectl &amp;&amp; \
chmod +x ./kubectl &amp;&amp; \
sudo mv ./kubectl /usr/local/bin/kubectl

Using Environment Variables for configuration

Let’s start off with an easy peasy example to see how to use environment variables by specifying them directly within our Pod specification.


apiVersion: v1
kind: Pod
metadata:
name: pod1
spec:
containers:
– name: nginx
image: nginx
env:
– name: ENVVAR1
value: value1
– name: ENVVAR2
value: value2

Notice how we define two variables in spec.containers.env — ENVVAR1 and ENVVAR2 with values value1 and value2 respectively.

Let’s start off by creating the Pod using the YAML specified above.

Pod is just a Kubernetes resource or object. The YAML file is something that describes its desired state along with some basic information – it is also referred to as a manifest, spec (shorthand for specification) or definition.

Use the kubectl apply command to submit the Pod information to Kubernetes.

To keep things simple, the YAML file is being referenced directly from the GitHub repo, but you can also download the file to your local machine and use it in the same way.

$ kubectl apply -f   https://raw.githubusercontent.com/abhirockzz/kubernetes-in-a-nutshell/master/configuration/kin-config-envvar-in-pod.yaml

pod/pod1 created

To check the environment variables, we will need to execute a command “inside” of the Pod using kubectl exec — you should see the ones which were seeded in the Pod definition.

Here, we have used grep to filter for the variable(s) we’re interested in

$ kubectl exec pod1 -it -- env | grep ENVVAR

ENVVAR1=value1
ENVVAR2=value2

What’s kubectl exec? In simple words, it allows you to execute a command in specific container within a Pod. In this case, our Pod has a single container, so we don’t need to specify one

Ok, with that concept out of the way, we can explore ConfigMaps.

Using a ConfigMap

The way it works is that your configuration is defined in a ConfigMap object which is then referenced in a Pod (or Deployment).

Let’s look at techniques using which you can create a ConfigMap

Using a manifest file

It’s possible to create a ConfigMap along with the configuration data stored as key-value pairs in the data section of the definition.


apiVersion: v1
kind: ConfigMap
metadata:
name: simpleconfig
data:
foo: bar
hello: world
apiVersion: v1
kind: Pod
metadata:
name: pod2
spec:
containers:
name: nginx
image: nginx
env:
name: FOO_ENV_VAR
valueFrom:
configMapKeyRef:
name: simpleconfig
key: foo
name: HELLO_ENV_VAR
valueFrom:
configMapKeyRef:
name: simpleconfig
key: hello

view raw

example.yaml

hosted with ❤ by GitHub

In the above manifest:

  • the ConfigMap named simpleconfig contains two pieces of (key-value) data — hello=world and foo=bar
  • simpleconfig is referenced by a Pod (pod2; the keys hello and foo are consumed as environment variables HELLO_ENV_VAR and FOO_ENV_VAR respectively.

Note that we have included the Pod and ConfigMap definition in the same YAML separated by a ---

Create the ConfigMap and confirm that the environment variables have been seeded

$ kubectl apply -f   https://raw.githubusercontent.com/abhirockzz/kubernetes-in-a-nutshell/master/configuration/kin-config-envvar-configmap.yaml

configmap/config1 created
pod/pod2 created

$ kubectl get configmap/config1

NAME      DATA   AGE
config1   2      18s

$ kubectl exec pod2 -it -- env | grep _ENV_

FOO_ENV_VAR=bar
HELLO_ENV_VAR=world

Shortcut using envVar

We consumed both the config data (foo and hello) by referencing them separately, but there is an easier way! We can use envFrom in our manifest to directly refer to all key-value data in a ConfigMap.

When using ConfigMap data this way, the key is directly used as the environment variable name. That’s why you need to follow the naming convention i.e. Each key must consist of alphanumeric characters, ‘-’, ‘_’ or ‘.’


apiVersion: v1
kind: ConfigMap
metadata:
name: config2
data:
FOO_ENV: bar
HELLO_ENV: world
apiVersion: v1
kind: Pod
metadata:
name: pod3
spec:
containers:
name: nginx
image: nginx
envFrom:
configMapRef:
name: config2

view raw

env-from.yaml

hosted with ❤ by GitHub

Just like before, we need to create the Pod and ConfigMap and confirm the existence of environment variables

$ kubectl apply -f   https://raw.githubusercontent.com/abhirockzz/kubernetes-in-a-nutshell/master/configuration/kin-config-envvar-with-envFrom.yaml

configmap/config2 created
pod/pod3 created

$ kubectl get configmap/config2

NAME      DATA   AGE
config2   2      25s

$ kubectl exec pod3 -it -- env | grep _ENV

HELLO_ENV=world
FOO_ENV=bar

Nice little trick ha? 🙂

Configuration data as files

Another interesting way to consume configuration data is by pointing to a ConfigMap in the spec.volumes section of your Deployment or Pod spec.

If you have no clue what Volumes (in Kubernetes) are, don’t worry. They will be covered in upcoming blogs. For now, just understand that volumes are a way of abstracting your container from the underlying storage system e.g. it could be a local disk or in the cloud such as Azure Disk, GCP Persistent Disk etc.


apiVersion: apps/v1
kind: Deployment
metadata:
name: testapp
spec:
selector:
matchLabels:
app: testapp
replicas: 1
template:
metadata:
labels:
app: testapp
spec:
volumes:
name: config-data-volume
configMap:
name: app-config
containers:
name: testapp
image: testapp
volumeMounts:
mountPath: /config
name: config-data-volume

In the above spec, pay attention to the spec.volumes section — notice that it refers to an existing ConfigMap. Each key in the ConfigMap is added as a file to the directory specified in the spec i.e. spec.containers.volumeMount.mountPath and the value is nothing but the contents of the file.

Note that the files in volumes are automatically updated if the ConfigMap changes.

In addition to traditional string based values, you can also include full-fledged files (JSON, text, YAML, etc.) as values in a ConfigMap spec.


apiVersion: v1
kind: ConfigMap
metadata:
name: config3
data:
appconfig.json: |
{
"array": [
1,
2,
3
],
"boolean": true,
"number": 123,
"object": {
"a": "b",
"c": "d",
"e": "f"
},
"string": "Hello World"
}
apiVersion: v1
kind: Pod
metadata:
name: pod4
spec:
containers:
– name: nginx
image: nginx
env:
– name: APP_CONFIG_JSON
valueFrom:
configMapKeyRef:
name: config3
key: appconfig.json

In the above example, we have embedded an entire JSON within the data section of our ConfigMap. To try this out, create the Pod and ConfigMap

$ kubectl apply -f   https://raw.githubusercontent.com/abhirockzz/kubernetes-in-a-nutshell/master/configuration/kin-config-envvar-json.yaml

configmap/config3 created
pod/pod4 created

$ kubectl get configmap/config3

NAME      DATA   AGE
config3   1     11s

As an exercise, confirm that the environment variable was seeded into the Pod. Few pointers:

  • the name of the Pod is pod4
  • double-check the name of the environment variable you should be looking for

You can also use kubectl CLI to create a ConfigMap. It might not be suitable for all use cases but it certainly makes things a lot easier

Using kubectl

There are multiple options:

Using --from-literal to seed config data

We’re seeding the following key-value pairs into the ConfigMap — foo_env=bar and hello_env=world

$ kubectl create configmap config4 --from-literal=foo_env=bar --from-literal=hello_env=world

Using --from-file

$ kubectl create configmap config5 --from-file=/config/app-config.properties

This will create a ConfigMap (config5) with

  • a key with the same name of the file i.e. app-config.properties in this case
  • and, value as the contents of the file

You can choose to use a different key (other than the file name) to override the default behavior

$ kubectl create configmap config6 --from-file=CONFIG_DATA=/config/app-config.properties

In this case, CONFIG_DATA will be the key

From files in a directory

You can seed data from multiple files (in a directory) at a time into a ConfigMap

$ kubectl create configmap config7 --from-file=/home/foo/config/

You will end up with

  • multiple keys which will the same as the individual file name
  • the value will be the contents of the respective file

Good to know

Here is a (non-exhaustive) list of things which you should bear in mind when using ConfigMaps:

  • Once you define environment variables ConfigMap, you can utilize them in the command section in Pod spec i.e. spec.containers.command using the $(VARIABLE_NAME) format
  • You need to ensure that the ConfigMap being referenced in a Pod is already created — otherwise, the Pod will not start. The only way to get around this is to mark the ConfigMap as optional.
  • Another case in which might prevent the Pod from starting is when you reference a key that actually does not exist in the ConfigMap.

You can also refer the ConfigMap API

That’s it for this edition of the “Kubernetes in a Nutshell” series. Stay tuned for more!

If you are interested in learning Kubernetes and Containers using Azure, simply create a free account and get going! A good starting point is to use the quickstarts, tutorials and code samples in the documentation to familiarize yourself with the service. I also highly recommend checking out the 50 days Kubernetes Learning Path. Advanced users might want to refer to Kubernetes best practices or the watch some of the videos for demos, top features and technical sessions.

I really hope you enjoyed and learned something from this article! Please like and follow if you did. Happy to get feedback via @abhi_tweeter or just drop a comment.

Posted in kubernetes | Tagged , | 1 Comment

Tutorial: Develop a Kafka Streams application for data processing and deploy it to Kubernetes

This tutorial will guide you through how to build a stateless stream processing application using the Kafka Streams library and run it in a Kubernetes cluster on Azure (AKS).

As you go through this, you’ll learn about the following:

  • What is Kafka Streams?
  • How to set up and configure a Docker container registry and Kubernetes cluster on Azure
  • What’s going on in the Java code for stream processing logic using Kafka Streams
  • How to build & deploy our app to Kubernetes and finally test it out using the Kafka CLI

The source code is on GitHub

a handy list of all the CLI commands is available at the end of this blog

Before we dive in, here is a snapshot of how the end state looks like.

Overview of Kafka Streams

It is a simple and lightweight client library, which can be easily embedded in any Java app or microservice, where the input and output data are stored in Kafka clusters. It has no external dependencies on systems other than Kafka itself and it’s partitioning model to horizontally scale processing while maintaining strong ordering guarantees. It has support for fault-tolerant local state, employs one-record-at-a-time processing to achieve millisecond processing latency and offers necessary stream processing primitives, along with a high-level Streams DSL and a low-level Processor API. The combination of “state stores” and “Interactive queries” allow you to leverage the state of your application from outside your application.

Pre-requistes:

If you don’t have it already, please install the Azure CLI and kubectl. The stream processing app is written in Java and uses Maven and you will also need Docker to build the app container image.

This tutorial assumes you have a Kafka cluster which is reachable from your Kubernetes cluster on Azure

AKS cluster setup

You need a single command to stand up a Kubernetes cluster on Azure. But, before that, we’ll have to create a resource group

export AZURE_SUBSCRIPTION_ID=[to be filled]
export AZURE_RESOURCE_GROUP=[to be filled]
export AZURE_REGION=[to be filled] (e.g. southeastasia)

Switch to your subscription and invoke az group create

az account set -s $AZURE_SUBSCRIPTION_ID
az group create -l $AZURE_REGION -n $AZURE_RESOURCE_GROUP

You can now invoke az aks create to create the new cluster

To keep things simple, the below command creates a single node cluster. Feel free to change the specification as per your requirements

export AKS_CLUSTER_NAME=[to be filled]

az aks create --resource-group $AZURE_RESOURCE_GROUP --name $AKS_CLUSTER_NAME --node-count 1 --node-vm-size Standard_B2s --node-osdisk-size 30 --generate-ssh-keys

Get the AKS cluster credentials using az aks get-credentials – as a result, kubectl will now point to your new cluster. You can confirm the same

az aks get-credentials --resource-group $AZURE_RESOURCE_GROUP --name $AKS_CLUSTER_NAME
kubectl get nodes

If you are interested in learning Kubernetes and Containers using Azure, simply create a free account and get going! A good starting point is to use the quickstarts, tutorials and code samples in the documentation to familiarize yourself with the service. I also highly recommend checking out the 50 days Kubernetes Learning Path. Advanced users might want to refer to Kubernetes best practices or the watch some of the videos for demos, top features and technical sessions.

Setup Azure Container Registry

Simply put, Azure Container Registry (ACR in short) is a managed private Docker registry in the cloud which allows you to build, store, and manage images for all types of container deployments.

Start by creating an ACR instance

export ACR_NAME=[to be filled]
az acr create --resource-group $AZURE_RESOURCE_GROUP --name $ACR_NAME --sku Basic

valid SKU values – Basic, Classic, Premium, Standard. See command documentation

Configure ACR to work with AKS

To access images stored in ACR, you must grant the AKS service principal the correct rights to pull images from ACR.

Get the appId of the service principal which is associated with your AKS cluster

AKS_SERVICE_PRINCIPAL_APPID=$(az aks show --name $AKS_CLUSTER_NAME --resource-group $AZURE_RESOURCE_GROUP --query servicePrincipalProfile.clientId -o tsv)

Find the ACR resource ID

ACR_RESOURCE_ID=$(az acr show --resource-group $AZURE_RESOURCE_GROUP --name $ACR_NAME --query "id" --output tsv)

Grant acrpull permissions to AKS service principal

az role assignment create --assignee $AKS_SERVICE_PRINCIPAL_APPID --scope $ACR_RESOURCE_ID --role acrpull

For some more details on this topic, check out one of my previous blog

{% link https://dev.to/azure/azure-tip-how-to-get-your-kubernetes-cluster-service-principal-and-use-it-to-access-other-azure-services-2735 %}

Alright, our AKS cluster along with ACR is ready to use! Let’s shift gears and look at the Kafka Streams code – it’s succinct and has been kept simple for the purposes of this tutorial.

Stream processing code

What the processing pipeline does is pretty simple. It makes use of the high-level Streams DSL API:

  • receives words from an input/source Kafka topic
  • converts it to upper case
  • stores the records in an output Kafka topic (sink)

Please not that the latest Kafka Streams library version at the time of writing was 2.3.0 and that’s what the app uses

        org.apache.kafka
        kafka-streams
        2.3.0

We start off with an instance of StreamsBuilder and invoke it’s stream method to hook on to the source topic (name: lower-case). What we get is a KStream object which is a representation of the continuous stream of records sent to the topic lower-case. Note that the inputs records are nothing but key value pairs.

    StreamsBuilder builder = new StreamsBuilder();
    KStream lowerCaseStrings = builder.stream(INPUT_TOPIC);

Ok we have our records in the form of an object – what do we do with them? How do we process them? In this case all we do is apply a simple transformation using mapValues to convert the record (the value, not the key) to upper case. This gives us another KStream instance – upperCaseStrings, whose records we are pushed to a sink topic named upper-case by invoking the to method.

    KStream upperCaseStrings = lowerCaseStrings.mapValues(new ValueMapper() {
        @Override
        public String apply(String str) {
            return str.toUpperCase();
        }
    });
    upperCaseStrings.to(OUTPUT_TOPIC);

That’s all in terms fo the setting up the stream and defining the logic. We create a Topology object using the build method in StreamsBuilder and use this object to create a KafkaStreams instance which is a representation of our application itself. We start the stream processing using the start method

    Topology topology = builder.build();
    KafkaStreams streamsApp = new KafkaStreams(topology, getKafkaStreamsConfig());
    streamsApp.start();

The getKafkaStreamsConfig() is just a helper method which creates a Properties object which contains Kafka Streams specific configuration, including Kafka broker endpoint etc.

static Properties getKafkaStreamsConfig() {
    String kafkaBroker = System.getenv().get(KAFKA_BROKER_ENV_VAR);
    Properties configurations = new Properties();
    configurations.put(StreamsConfig.BOOTSTRAP_SERVERS_CONFIG, kafkaBroker + ":9092");
    configurations.put(StreamsConfig.APPLICATION_ID_CONFIG, APP_ID);
    configurations.put(StreamsConfig.DEFAULT_KEY_SERDE_CLASS_CONFIG, Serdes.String().getClass().getName());
    configurations.put(StreamsConfig.DEFAULT_VALUE_SERDE_CLASS_CONFIG, Serdes.String().getClass().getName());
    configurations.put(StreamsConfig.REQUEST_TIMEOUT_MS_CONFIG, "20000");
    configurations.put(StreamsConfig.RETRY_BACKOFF_MS_CONFIG, "500");

    return configurations;
}

That’s it for the code. It’s time to deploy it!

From your laptop to a Docker Registry in the cloud

Clone the GitHub repo, change to the correct directory and build the application JAR

git clone https://github.com/abhirockzz/kafka-streams-kubernetes
cd kafka-streams-kubernetes
mvn clean isntall

You should see kstreams-lower-to-upper-1.0.jar in the target directory

Here is the Dockerfile for our stream processsing app

FROM openjdk:8-jre
WORKDIR /
COPY target/kstreams-lower-to-upper-1.0.jar /
CMD ["java", "-jar","kstreams-lower-to-upper-1.0.jar"]

We will now build a Docker image …

export DOCKER_IMAGE=kstreams-lower-to-upper:v1
export ACR_SERVER=$ACR_NAME.azurecr.io
docker build -t $DOCKER_IMAGE .

… and push it to Azure Container Registry

az acr login --name $ACR_NAME
docker tag $DOCKER_IMAGE $ACR_SERVER/$DOCKER_IMAGE
docker push $ACR_SERVER/$DOCKER_IMAGE

Once this is done, you can confirm using az acr repository list

az acr repository list --name $ACR_NAME --output table

Deploy to Kubernetes

Our application is a stateless processor and we will deploy it as a Kubernetes Deployment with two instances (replicas).

In case you’re interested in diving deeper into native Kubernetes primitives for managing stateless applications, check out this blog

{% link https://dev.to/itnext/stateless-apps-in-kubernetes-beyond-pods-4p52
%}

The kstreams-deployment.yaml file contains the spec the Deployment which will represent our stream processing app. You need to modify it add the following information as per your environment

  • Azure Container Registry name (which you earlier specified using ACR_NAME)
  • The endpoint for your Kafka broker e.g. my-kafka:9092
    spec:
    containers:
    - name: kstreams-lower-to-upper
        image: [REPLACE_ACR_NAME].azurecr.io/kstreams-lower-to-upper:v1
        env:
        - name: KAFKA_BROKER
            value: [to be filled]
    

To deploy and confirm

kubectl apply -f kstreams-deployment.yaml
kubectl get pods -l=app=kstream-lower-to-upper

You should see two pods in the Running state

The moment of truth!

It’s time to test our end to end flow. Just to summarize:

  • you will produce data to the input Kafka topic (lower-case) using the Kafka CLI locally
  • the stream processing application in AKS will churn the data and put it back to another Kafka topic
  • your local Kafka CLI based consumer process will get that data from the output topic (upper-case)

Let’ create the Kafka topics first

export KAFKA_HOME=[kafka installation directory]
export INPUT_TOPIC=lower-case
export OUTPUT_TOPIC=upper-case

$KAFKA_HOME/bin/kafka-topics.sh --create --topic $INPUT_TOPIC --partitions 2 --replication-factor 1 --bootstrap-server $KAFKA_BROKER
$KAFKA_HOME/bin/kafka-topics.sh --create --topic $OUTPUT_TOPIC --partitions 2 --replication-factor 1 --bootstrap-server $KAFKA_BROKER

$KAFKA_HOME/bin/kafka-topics.sh --list --bootstrap-server $KAFKA_BROKER

Start consumer process

export KAFKA_HOME=[kafka installation directory]
export KAFKA_BROKER=[kafka broker e.g. localhost:9092]
export OUTPUT_TOPIC=upper-case

$KAFKA_HOME/bin/kafka-console-consumer.sh --bootstrap-server 
$KAFKA_BROKER --topic $OUTPUT_TOPIC --from-beginning

Start producer process (different terminal)

export KAFKA_HOME=[kafka installation directory]
export KAFKA_BROKER=[kafka broker e.g. localhost:9092]
export INPUT_TOPIC=lower-case

$KAFKA_HOME/bin/kafka-console-producer.sh --broker-list $KAFKA_BROKER --topic $INPUT_TOPIC

You will get a prompt and you can start entering values e.g.

&gt; foo
&gt; bar
&gt; baz
&gt; john
&gt; doe

Wait for a few seconds and check the terminal window. You should see the upper case form of the above records i.e. FOO, BAR etc.

Clean up

To clean up your AKS cluster, ACR instance and related resources

az group delete --name $AZURE_RESOURCE_GROUP --yes --no-wait

(as promised)

Handy list of commands..

.. for your reference

Azure Kubernetes Service

Azure Container Registry

General commands

If you found this article helpful, please like and follow! Happy to get feedback via @abhi_tweeter or just drop a comment 🙂
?

Posted in kubernetes | Tagged , , , , | 1 Comment

How to quickly test connectivity to your Azure Event Hubs for Kafka cluster, without writing any code

You have a shiny new Kafka enabled broker on Azure Event Hubs and want to quickly test it out without writing cumbersome client (producer and consumer) code. Try out the instructions in this post and you should (hopefully) have everything setup and sanity tested in ~ 10 minutes.

Clone this GitHub repo and change to the correct directory

git clone https://github.com/abhirockzz/azure-eventhubs-kafka-cli-quickstart
cd azure-eventhubs-kafka-cli-quickstart

Now, you can either choose to install the Azure CLI if you don’t have it already (should be quick!) or just use the Azure Cloud Shell from your browser.

Create your Kafka enabled Event Hubs cluster

If you have a cluster already, skip this and go to the “Get what you need to connect to the cluster” section

Set some variables to avoid repetition

AZURE_SUBSCRIPTION=[to be filled]
AZURE_RESOURCE_GROUP=[to be filled]
AZURE_LOCATION=[to be filled]
EVENT_HUBS_NAMESPACE=[to be filled]
EVENT_HUB_NAME=[to be filled]

Create the resource group if you don’t have one already

az account set --subscription $AZURE_SUBSCRIPTION
az group create --name $AZURE_RESOURCE_GROUP --location $AZURE_LOCATION

Create an Event Hubs namespace (similar to a Kafka Cluster)

az eventhubs namespace create --name $EVENT_HUBS_NAMESPACE --resource-group $AZURE_RESOURCE_GROUP --location $AZURE_LOCATION --enable-kafka true --enable-auto-inflate false

And then create an Event Hub (same as a Kafka topic)

az eventhubs eventhub create --name $EVENT_HUB_NAME --resource-group $AZURE_RESOURCE_GROUP --namespace-name $EVENT_HUBS_NAMESPACE --partition-count 3

Get what you need to connect to the cluster

Get the connection string and credentials for your cluster

For details, read how Event Hubs uses Shared Access Signatures for authorization

Start by getting the Event Hub rule/policy name

EVENT_HUB_AUTH_RULE_NAME=$(az eventhubs namespace authorization-rule list --resource-group $AZURE_RESOURCE_GROUP --namespace-name $EVENT_HUBS_NAMESPACE | jq '.[0].name' | sed "s/\"//g")

And, then make use of the rule name to extract the connection string

az eventhubs namespace authorization-rule keys list --resource-group $AZURE_RESOURCE_GROUP --namespace-name $EVENT_HUBS_NAMESPACE --name $EVENT_HUB_AUTH_RULE_NAME | jq '.primaryConnectionString'

This information is sensitive – please excercise caution

Copy the result of above command in the password field within jaas.conf file.

KafkaClient {
    org.apache.kafka.common.security.plain.PlainLoginModule required
    username="$ConnectionString"
    password=enter-connection-string-here;
};

DO NOT remove the trailing ; in jaas.conf

Connect to the cluster using Kafka CLI

I am assuming that you already have a Kafka setup (local or elsewhere) – the Kafka CLI is bundled along with it. If not, it shouldn’t take too long to set it up – just download, unzip and you’re ready to go!

On your local machine, use a new terminal to start a Kafka Consumer – set the required variables first

EVENT_HUBS_NAMESPACE=[to be filled]
EVENT_HUB_NAME=[to be filled]
export KAFKA_OPTS="-Djava.security.auth.login.config=jaas.conf"
KAFKA_INSTALL_HOME=[to be filled] e.g. /Users/jdoe/kafka_2.12-2.3.0/

Start consuming

$KAFKA_INSTALL_HOME/bin/kafka-console-consumer.sh --topic $EVENT_HUB_NAME --bootstrap-server $EVENT_HUBS_NAMESPACE.servicebus.windows.net:9093 --consumer.config client_common.properties

Use another terminal to start a Kafka Producer – set the required variables first

EVENT_HUBS_NAMESPACE=[to be filled]
EVENT_HUB_NAME=[to be filled]
export KAFKA_OPTS="-Djava.security.auth.login.config=jaas.conf"
KAFKA_INSTALL_HOME=[to be filled] e.g. /Users/jdoe/kafka_2.12-2.3.0/

Start the producer

$KAFKA_INSTALL_HOME/bin/kafka-console-producer.sh --topic $EVENT_HUB_NAME --broker-list $EVENT_HUBS_NAMESPACE.servicebus.windows.net:9093 --producer.config client_common.properties

You will get a prompt and you can start entering values e.g.

&gt; foo
&gt; bar
&gt; baz
&gt; john
&gt; doe

Switch over to the consumer terminal to confirm you have got the messages!

For your reference…

Here is a handy list of all the Event Hubs related CLI commands which were used

I really hope you enjoyed and learned something from this article! Please like and follow if you did. Happy to get feedback via @abhi_tweeter or just drop a comment.

Posted in Java EE | Tagged , , | Leave a comment

How to get your Kubernetes cluster service principal and use it to access other Azure services?

So, you have a Kubernetes cluster on Azure (AKS) which needs to access other Azure services like Azure Container Registry (ACR)? You can use your AKS cluster service principal for this.

All you need to do is delegate access to the required Azure resources to the service principal. Simply create a role assignment using az role assignment create to do the following:

  • specify the particular scope, such as a resource group
  • then assign a role that defines what permissions the service principal has on the resource

It looks something like this:

az role assignment create --assignee $AKS_SERVICE_PRINCIPAL_APPID --scope $ACR_RESOURCE_ID --role $SERVICE_ROLE

Notice that the --assignee here is nothing but the service principal and you’re going to need it.

When you create an AKS cluster in the Azure portal or using the az aks create command from the Azure CLI, Azure can automatically generate a service principal. Alternatively, you can create one your self using az ad sp create-for-rbac --skip-assignment and then use the service principal appId in --service-principal and --client-secret (password) parameters in the az aks create command.

You can use a handy little query in the az aks show command to locate the service principal quickly!

az aks show --name $AKS_CLUSTER_NAME --resource-group $AKS_CLUSTER_RESOURCE_GROUP --query servicePrincipalProfile.clientId -o tsv

This will the service principal appId! You can use it to grant permissions. For e.g. if you want to allow AKS to work with ACR, you can grant the acrpull role:

az role assignment create --assignee $AKS_SERVICE_PRINCIPAL_APPID --scope $ACR_RESOURCE_ID --role acrpull

Here is the list of commands for your reference:

If you found this article helpful, please like and follow! Happy to get feedback via @abhi_tweeter or just drop a comment 🙂

Posted in kubernetes | Tagged , , | 1 Comment

Beyond Pods: how to orchestrate stateless apps in Kubernetes?

Hello Kubernauts! Welcome to the “Kubernetes in a nutshell” blog series 🙂

This is the first part which will cover native Kubernetes primitives for managing stateless applications. One of the most common use cases for Kubernetes is to orchestrate and operate stateless services. In Kubernetes, you need a Pod (or a group of Pods in most cases) to represent a service or application – but there is more to it! We will go beyond a basic Pod and get explore other high level components namely ReplicaSets and Deployments.

As always, the code is available on GitHub

You will need a Kubernetes cluster to begin with. This could be a simple, single-node local cluster using minikube, Docker for Mac etc. or a managed Kubernetes service from Azure (AKS), Google, AWS etc. To access your Kubernetes cluster, you will need kubectl, which is pretty easy to install.

e.g. to install kubectl for Mac, all you need is

curl -LO https://storage.googleapis.com/kubernetes-release/release/$(curl -s https://storage.googleapis.com/kubernetes-release/release/stable.txt)/bin/darwin/amd64/kubectl &amp;&amp; \
chmod +x ./kubectl &amp;&amp; \
sudo mv ./kubectl /usr/local/bin/kubectl

In case you already have the Azure CLI installed, all you need to do is az acs kubernetes install-cli.

If you are interested in learning Kubernetes and Containers using Azure, simply create a free account and get going! A good starting point is to use the quickstarts, tutorials and code samples in the documentation to familiarize yourself with the service. I also highly recommend checking out the 50 days Kubernetes Learning Path. Advanced users might want to refer to Kubernetes best practices or the watch some of the videos for demos, top features and technical sessions.

Let’s start off by understanding the concept of a Pod.

Pod

A Pod is the smallest possible abstraction in Kubernetes and it can have one or more containers running within it. These containers share resources (storage, volume) and can communicate with each other over localhost.

Create a simple Pod using the YAML file below.

Pod is just a Kubernetes resource or object. The YAML file is something that describes its desired state along with some basic information – it is also referred to as a manifest, spec (shorthand for specification) or definition.


apiVersion: v1
kind: Pod
metadata:
name: kin-stateless-1
spec:
containers:
– name: nginx
image: nginx

view raw

simplepod.yaml

hosted with ❤ by GitHub

As a part of the Pod spec, we convey our intent to run nginx in Kubernetes and use the spec.containers.image to point to its container image on DockerHub.

Use the kubectl apply command to submit the Pod information to Kubernetes.

To keep things simple, the YAML file is being referenced directly from the GitHub repo, but you can also download the file to your local machine and use it in the same way.

$ kubectl apply -f https://raw.githubusercontent.com/abhirockzz/kubernetes-in-a-nutshell/master/stateless-apps/kin-stateless-pod.yaml

pod/kin-stateless-1 created

$ kubectl get pods

NAME                               READY   STATUS    RESTARTS   AGE
kin-stateless-1                    1/1     Running   0          10s

This should work as expected. Now, let’s delete the Pod and see what happens. For this, we will need to use kubectl delete pod

$ kubectl delete pod kin-stateless-1
pod "kin-stateless-1" deleted

$ kubectl get pods
No resources found.

…. and just like that, the Pod is gone!

For serious applications, you have to take care of the following aspects:

  • High availability and resiliency — Ideally, your application should be robust enough to self-heal and remain available in face of failure e.g. Pod deletion due to node failure, etc.
  • Scalability — What if a single instance of your app (Pod) does not suffice? Wouldn’t you want to run replicas/multiple instances?

Once you have multiple application instances running across the cluster, you will need to think about:

  • Scale — Can you count on the underlying platform to handle horizontal scaling automatically?
  • Accessing your application — How do clients (internal or external) reach your application and how is the traffic regulated across multiple instances (Pods)?
  • Upgrades — How can you handle application updates in a non-disruptive manner i.e. without downtime?

Enough about problems. Let’s look into some possible solutions!

Pod Controllers

Although it is possible to create Pods directly, it makes sense to use higher-level components that Kubernetes provides on top of Pods in order to solve the above mentioned problems. In simple words, these components (also called Controllers) can create and manage a group of Pods.

The following controllers work in the context of Pods and stateless apps:

  • ReplicaSet
  • Deployment
  • ReplicationController

There are other Pod controllers like StatefulSet, Job, DaemonSet etc. but they are not relevant to stateless apps, hence not discussed here

ReplicaSet

A ReplicaSet can be used to ensure that a fixed number of replicas/instances of your application (Pod) are always available. It identifies the group of Pods that it needs to manage with the help of (user-defined) selector and orchestrates them (creates or deletes) to maintain the desired instance count.

Here is what a common ReplicaSet spec looks like


apiVersion: apps/v1
kind: ReplicaSet
metadata:
name: kin-stateless-rs
spec:
replicas: 2
selector:
matchLabels:
app: kin-stateless-rs
template:
metadata:
labels:
app: kin-stateless-rs
spec:
containers:
– name: nginx
image: nginx

view raw

rs.yaml

hosted with ❤ by GitHub

Let’s create the ReplicaSet

$ kubectl apply -f  https://raw.githubusercontent.com/abhirockzz/kubernetes-in-a-nutshell/master/stateless-apps/kin-stateless-replicaset.yaml

replicaset.apps/kin-stateless-rs created

$ kubectl get replicasets

NAME               DESIRED   CURRENT   READY   AGE
kin-stateless-rs   2         2         2       1m11s

$ kubectl get pods --selector=app=kin-stateless-rs

NAME                     READY   STATUS    RESTARTS   AGE
kin-stateless-rs-zn4p2   1/1     Running   0          13s
kin-stateless-rs-zxp5d   1/1     Running   0          13s

Our ReplicaSet object (named kin-stateless-rs) was created along with two Pods (notice that the names of the Pods contain a random alphanumeric string e.g. zn4p2)

This was as per what we had supplied in the YAML (spec):

  • spec.replicas was set to two
  • selector.matchLabels was set to app: kin-stateless-rs and matched the .spec.template.metadata.labels field in the Pod specification.

Labels are simple key-value pairs which can be added to objects (such as a Pod in this case).

We used --selector in the kubectl get command to filter the Pods based on their labels which in this case was app=kin-stateless-rs.

Try deleting one of the Pods (just like you did in the previous case)

Please note that the Pod name will be different in your case, so make sure you use the right one.

$ kubectl delete pod kin-stateless-rs-zxp5d

pod "kin-stateless-rs-zxp5d" deleted

$ kubectl get pods -l=app=kin-stateless-rs

NAME                     READY   STATUS    RESTARTS   AGE
kin-stateless-rs-nghgk   1/1     Running   0          9s
kin-stateless-rs-zn4p2   1/1     Running   0          5m

We still have two Pods! This is because a new Pod (highlighted) was created to satisfy the replica count (two) of the ReplicaSet.

To scale your application horizontally, all you need to do is update the spec.replicas field in the manifest file and submit it again.

As an exercise, try scaling it up to five replicas and then going back to three.

So far so good! But this does not solve all the problems. One of them is handling application updates — specifically, in a way that does not require downtime. Kubernetes provides another component which works on top of ReplicaSets to handle this and more.

Deployment

A Deployment is an abstraction which manages a ReplicaSet — recall from the previous section, that a ReplicaSet manages a group of Pods. In addition to elastic scalability, Deployments provide other useful features that allow you to manage updates, rollback to a previous state, pause and resume the deployment process, etc. Let’s explore these.

A Kubernetes Deployment borrows the following features from its underlying ReplicaSet:

  • Resiliency — If a Pod crashes, it is automatically restarted, thanks to the ReplicaSet. The only exception is when you set the restartPolicy in the Pod specification to Never.
  • Scaling — This is also taken care of by the underlying ReplicaSet object.

This what a typical Deployment spec looks like


apiVersion: apps/v1
kind: Deployment
metadata:
name: kin-stateless-depl
spec:
replicas: 2
selector:
matchLabels:
app: kin-stateless-depl
template:
metadata:
labels:
app: kin-stateless-depl
spec:
containers:
name: nginx
image: nginx

view raw

deployment.yaml

hosted with ❤ by GitHub

Create the Deployment and see which Kubernetes objects get created

$ kubectl apply -f  https://raw.githubusercontent.com/abhirockzz/kubernetes-in-a-nutshell/master/stateless-apps/kin-stateless-deployment.yaml
deployment.apps/kin-stateless-depl created

$ kubectl get deployment kin-stateless-dp
NAME               READY   UP-TO-DATE   AVAILABLE   AGE
kin-stateless-dp   2/2     2            2           10

$ kubectl get replicasets
NAME                         DESIRED   CURRENT   READY   AGE
kin-stateless-dp-8f9b4d456   2         2         2       12

$ kubectl get pods -l=app=kin-stateless-dp
NAME                               READY   STATUS    RESTARTS   AGE
kin-stateless-dp-8f9b4d456-csskb   1/1     Running   0          14s
kin-stateless-dp-8f9b4d456-hhrj7   1/1     Running   0          14s

Deployment (kin-stateless-dp) got created along with the ReplicaSet and (two) Pods as specified in the spec.replicas field. Great! Now, let’s peek into the Pod to see which nginx version we’re using — please note that the Pod name will be different in your case, so make sure you use the right one

$ kubectl exec kin-stateless-dp-8f9b4d456-csskb -- nginx -v
nginx version: nginx/1.17.3

This is because the latest tag of the nginx image was picked up from DockerHub which happens to be v1.17.3 at the time of writing.

What’s kubectl exec? In simple words, it allows you to execute a command in specific container within a Pod. In this case, our Pod has a single container, so we don’t need to specify one

Update a Deployment

You can trigger an update to an existing Deployment by modifying the template section of the Pod spec — a common example being updating to a newer version (label) of a container image. You can specify it using spec.strategy.type of the Deployment manifest and valid options are – Rolling update and Recreate.

Rolling update

Rolling updates ensure that you don’t incur application downtime during the update process — this is because the update happens one Pod at a time. There is a point in time where both the previous and current versions of the application co-exist. The old Pods are deleted once the update is complete, but there will a phase where the total number of Pods in your Deployment will be more than the specified replicas count.

It is possible to further tune this behavior using the maxSurge and maxUnavailable settings.

  • spec.strategy.rollingUpdate.maxSurge — maximum no. of Pods which can be created in addition to the specified replica count
  • spec.strategy.rollingUpdate.maxUnavailable — defines the maximum no. of Pods which are not available

Recreate

This is quite straightforward — the old set of Pods are deleted before the new versions are rolled out. You could have achieved the same results using ReplicaSets by first deleting the old one and then creating a new one with the updated spec (e.g. new docker image etc.)

Let’s try and update the application by specifying an explicit Docker image tag — in this case, we’ll use 1.16.0. This means that once we update our app, this version should reflect when we introspect our Pod.

Download the Deployment manifest above, update it to change spec.containers.image from nginx to nginx:1.16.0 and submit it to the cluster – this will trigger an update

$ kubectl apply -f deployment.yaml
deployment.apps/kin-stateless-dp configured

$ kubectl get pods -l=app=kin-stateless-dp
NAME                                READY   STATUS    RESTARTS   AGE
kin-stateless-dp-5b66475bd4-gvt4z   1/1     Running   0          49s
kin-stateless-dp-5b66475bd4-tvfgl   1/1     Running   0          61s

You should now see a new set of Pods (notice the names). To confirm the update:

$ kubectl exec kin-stateless-dp-5b66475bd4-gvt4z -- nginx -v
nginx version: nginx/1.16.0

Please note that the Pod name will be different in your case, so make sure you use the right one

Rollback

If things don’t go as expected with the current Deployment, you can revert back to the previous version in case the new one is not working as expected. This is possible since Kubernetes stores the rollout history of a Deployment in the form of revisions.

To check the history for the Deployment:

$ kubectl rollout history deployment/kin-stateless-dp

deployment.extensions/kin-stateless-dp

REVISION  CHANGE-CAUSE
1         
2         

Notice that there are two revisions, with 2 being the latest one. We can roll back to the previous one using kubectl rollout undo

$ kubectl rollout undo deployment kin-stateless-dp
deployment.extensions/kin-stateless-dp rolled back

$ kubectl get pods -l=app=kin-stateless-dp
NAME                                READY   STATUS        RESTARTS   AGE
kin-stateless-dp-5b66475bd4-gvt4z   0/1     Terminating   0          10m
kin-stateless-dp-5b66475bd4-tvfgl   1/1     Terminating   0          10m
kin-stateless-dp-8f9b4d456-d4v97    1/1     Running       0          14s
kin-stateless-dp-8f9b4d456-mq7sb    1/1     Running       0          7s

Notice the intermediate state where Kubernetes was busy terminating the Pods of the old Deployment while making sure that new Pods are created in response to the rollback request.

If you check the nginx version again, you will see that the app has indeed been rolled back to 1.17.3.

$ kubectl exec kin-stateless-dp-8f9b4d456-d4v97 -- nginx -v
nginx version: nginx/1.17.3

Pause and Resume

It is also possible to pause a Deployment rollout and resume it back after applying changes to it (during the paused state).

ReplicationController

A ReplicationController is similar to a Deployment or ReplicaSet. However, it is not a recommended approach for stateless app orchestration since a Deployment offers a richer set of capabilities (as described in the previous section). You can read more about them in the Kubernetes documentation.

References

Check out Kubernetes documentation for the API details of the resources we discussed in this post i.e. Pod, ReplicaSet and Deployment

Stay tuned for more in the next part of the series!

I really hope you enjoyed and learned something from this article! Please like and follow if you did. Happy to get feedback via @abhi_tweeter or just drop a comment.

Posted in kubernetes | Tagged , | 1 Comment

Code walkthrough for “funcy” – a Serverless Slack app using Azure Functions

In the previous blog, we explored how to deploy a serverless backend for a Slack slash command on to Azure Functions

As promised, it’s time to walk through the code to see how the function was implemented. The code is available on GitHub for you to grok.

If you are interested in learning Serverless development with Azure Functions, simply create a free Azure account and get started! I would highly recommend checking out the quickstart guides, tutorials and code samples in the documentation, make use of the guided learning path in case that’s your style or download the Serverless Computing Cookbook.

Structure

The code structure is as follows:

  • Function logic resides in the Funcy class (package com.abhirockzz.funcy)
  • and, the rest of the stuff includes model classes aka POJOs – packages com.abhirockzz.funcy.model.giphy and com.abhirockzz.funcy.model.slack for GIPHY and Slack respectively

Function entry point

The handleSlackSlashCommand method defines the entry point for our function. It is decorated with the @FunctionName annotation (and also defines the function name – funcy)

@FunctionName(funcy)
public HttpResponseMessage handleSlackSlashCommand(
        @HttpTrigger(name = "req", methods = {HttpMethod.POST}, authLevel = AuthorizationLevel.ANONYMOUS) HttpRequestMessage&lt;Optional&gt; request,
        final ExecutionContext context)

It is triggered via a HTTP request (from Slack). This is defined by the @HttpTrigger annotation.

@HttpTrigger(name = "req", methods = {HttpMethod.POST}, authLevel = AuthorizationLevel.ANONYMOUS)

Note that the function:

  • responds to HTTP POST
  • does not need explicit authorization for invocation

For details, check out the Functions Runtime Java API documentation
@FunctionName
@HttpTrigger
HttpMethod (Enum)

Method parameters

The handleSlackSlashCommand consists of two parameters – HttpRequestMessage and ExecutionContext.

HttpRequestMessage is a helper class in the Azure Functions Java library. It’s instance is injected at runtime and is used to access HTTP message body and headers (sent by Slack).

ExecutionContext provides a hook into the functions runtime – in this case, it’s used to get a handle to java.​util.​logging.Logger.

For details, check out the Functions Runtime Java API documentation
HttpRequestMessage
ExecutionContext

From Slack Slash Command to a GIPHY GIF – core logic

From an end user perspective, the journey is short and sweet! But here is a gist of what’s happening behind the scenes.

The Slack request is of type application/x-www-form-urlencoded, and is first decoded and then converted to a Java Map for ease of use.

    Map slackdataMap = new HashMap();
    try {
        decodedSlackData = URLDecoder.decode(slackData, "UTF-8");
    } catch (Exception ex) {
        LOGGER.severe("Unable to decode data sent by Slack - " + ex.getMessage());
        return errorResponse;
    }

    for (String kv : decodedSlackData.split("&amp;")) {
        try {
            slackdataMap.put(kv.split("=")[0], kv.split("=")[1]);
        } catch (Exception e) {
            /*
            probably because some value in blank - most likely 'text' (if user does not send keyword with slash command).
            skip that and continue processing other attrbiutes in slack data
             */
        }
    }

see https://api.slack.com/slash-commands#app_command_handling

GIPHY API key and Slack Signing Secret are mandatory for the function to work. These are expected via environment variables – we fail fast if they don’t exist.

    String signingSecret = System.getenv("SLACK_SIGNING_SECRET");

    if (signingSecret == null) {
        LOGGER.severe("SLACK_SIGNING_SECRET environment variable has not been configured");
        return errorResponse;
    }
    String apiKey = System.getenv("GIPHY_API_KEY");

    if (apiKey == null) {
        LOGGER.severe("GIPHY_API_KEY environment variable has not been configured");
        return errorResponse;
    }

Signature validation

Every Slack HTTP request sent to our function includes a signature in the X-Slack-Signature HTTP header. It is created by a combination of the the body of the request and the Slack application signing secret using a standard HMAC-SHA256 keyed hash.

The function also calculates a signature (based on the recipe) and confirms that it the same as the one sent by Slack – else we do not proceed. This is done in the matchSignature method

private static boolean matchSignature(String signingSecret, String slackSigningBaseString, String slackSignature) {
    boolean result;

    try {
        Mac mac = Mac.getInstance("HmacSHA256");
        mac.init(new SecretKeySpec(signingSecret.getBytes(), "HmacSHA256"));
        byte[] hash = mac.doFinal(slackSigningBaseString.getBytes());
        String hexSignature = DatatypeConverter.printHexBinary(hash);
        result = ("v0=" + hexSignature.toLowerCase()).equals(slackSignature);
    } catch (Exception e) {
        LOGGER.severe("Signature matching issue " + e.getMessage());
        result = false;
    }
    return result;
}

Once the signatures match, we can be confident that our function was indeed invoked by Slack.

Invoking the GIPHY API

The GIPHY Random API is invoked with the search criteria (keyword) sent by user (along with the Slash command) e.g. /funcy catcat is the keyword. This taken care of by the getRandomGiphyImage and is a simple HTTP GET using the Apache HTTPClient library. The JSON response is marshalled into a GiphyRandomAPIGetResponse POJO using Jackson.

Note that the org.apache.http.impl.client.CloseableHttpClient (HTTP_CLIENT in the below snippet) object is created lazily and there is only one instance per function i.e. a new object is not created every time a function is invoked.

For details, please refer to this section in the Azure Functions How-to guide

....
private static CloseableHttpClient HTTP_CLIENT = null;
....
private static String getRandomGiphyImage(String searchTerm, String apiKey) throws IOException {
    String giphyResponse = null;
    if (HTTP_CLIENT == null) {
        HTTP_CLIENT = HttpClients.createDefault();
        LOGGER.info("Instantiated new HTTP client");
    }
    String giphyURL = "http://api.giphy.com/v1/gifs/random?tag=" + searchTerm + "&amp;api_key=" + apiKey;
    LOGGER.info("Invoking GIPHY endpoint - " + giphyURL);

    HttpGet giphyGETRequest = new HttpGet(giphyURL);
    CloseableHttpResponse response = HTTP_CLIENT.execute(giphyGETRequest);

    giphyResponse = EntityUtils.toString(response.getEntity());

    return giphyResponse;
}
....
GiphyRandomAPIGetResponse giphyModel = MAPPER.readValue(giphyResponse, GiphyRandomAPIGetResponse.class);

Sending the response back to Slack

We extract the required information – title of the image (e.g. cat thanksgiving GIF) and its URL (e.g. https://media2.giphy.com/media/v2CaxWLFw4a5y/giphy-downsized.gif). This is used to create an instance of SlackSlashCommandResponse POJO which represents the JSON payload returned to Slack.

    String title = giphyModel.getData().getTitle();
    String imageURL = giphyModel.getData().getImages().getDownsized().getUrl();

    SlackSlashCommandResponse slackResponse = new SlackSlashCommandResponse();
    slackResponse.setText(SLACK_RESPONSE_STATIC_TEXT);

    Attachment attachment = new Attachment();
    attachment.setImageUrl(imageURL);
    attachment.setText(title);

    slackResponse.setAttachments(Arrays.asList(attachment));

Finally, we create an instance of HttpResponseMessage (using a fluent builder API). The function runtime takes care of converting the POJO into a valid JSON payload which Slack expects.

return request.createResponseBuilder(HttpStatus.OK).header("Content-type", "application/json").body(slackResponse).build();

For details on the HttpResponseMessage interface, check out the Functions Runtime Java API documentation

Before we wrap up, let’s go through the possible error scenarios and how they are handled.

Error handling

General errors

As per Slack recommendation, exceptions in the code are handled and a retry response is returned to the user. The SlackSlashCommandErrorResponse POJO represents the JSON payload which requests the user to retry the operation and is returned in the form of a HttpResponseMessage object.

return request.createResponseBuilder(HttpStatus.OK).header("Content-type", "application/json").body(slackResponse).build();

The user gets a Sorry, that didn't work. Please try again. message in Slack

User error

It is possible that the user does not include a search criteria (keyword) along with the Slash command e.g. /funcy. In this case, the user gets an explicit response in Slack – Please include a keyword with your slash command e.g. /funcy cat.

To make this possible, the request data (Map) is checked for the presence of a specific attribute (text) – if not, we can be certain that the user did not send the search keyword.

    ....
    HttpResponseMessage missingKeywordResponse = request
            .createResponseBuilder(HttpStatus.OK)
            .header("Content-type", "application/json")
            .body(new SlackSlashCommandErrorResponse("ephemeral", "Please include a keyword with your slash command e.g. /funcy cat")).build();
   ....
   if (!slackdataMap.containsKey("text")) {
        return missingKeywordResponse;
    }
   ....

Timeouts

If the call times out (which will if the function takes > than 3000 ms), Slack will automatically send an explicit response – Darn - that slash command didn't work (error message: Timeout was reached). Manage the command at funcy-slack-app.

Resources

The below mentioned resources were leveraged specifically for developing the demo app presented in this blog post, so you’re likely to find them useful as well!

I really hope you enjoyed and learned something from this article! Please like and follow if you did. Happy to get feedback via @abhi_tweeter or just drop a comment.

Posted in serverless | Tagged , , , , | 1 Comment